Smaller Git Repo Size Using Git LFS
(🤔 Xcode Assets)
Summary
If you want to see a comparison of Git with and without Git LFS, see this section below.
Have you ever gone to clone a repository (repo), and ended up just sitting there staring at the slow moving percentage…😶?
Yeah, me too — this may help!
Often times with a project, like with Xcode projects, we check assets into Git so that our app has immediate access to those files (images, videos, audio files, etc.). Over time, changes to those assets may end up bloating your repo’s size1 😅. When this happens, Git operations like cloning can take an unfortunate amount of time…
Luckily, there is a Git extension called Git Large File Storage (LFS) to help manage your large files (without changing your Git workflow 😁), which means:
- 🏃♀️ Faster Git cloning and fetching since there is less data to download!
- 💪 Reduce the size of your repo.
1. Git is less effective at compressing binary files, and therefore ends up storing near duplicates of those files. Read more.
Getting Started with Git Large File Storage (LFS)
There are different ways to install Git LFS, but if you are on a Mac: brew install git-lfs
Setup is pretty straight forward. Do the following to add files or folders to Git LFS:
- Setup your repo to use Git LFS.
git lfs install
- Add a file type to Git LFS.
git lfs track "*.png"- Note: replace png with other file type(s).
- Add a whole folder to Git LFS.
git lfs track path/to/some/folders/*- If you have an Xcode project, consider adding the assets folder (or if you have a custom resource folder). Look for the Assets.xcassets folder 😉.
- Make sure you commit the .gitattributes file.
git add .gitattributes && git commit -m "Add Git LFS attribute dot file" && git push
- For files that are already being tracked in Git.
git lfs migrate import --no-rewrite test.zip *.mp3 *.psd
Don’t forget to make sure that installing Git LFS is part of your setup README for project :).
See the first bullet under considerations below for more details.
That’s it 🎊 — Go about your normal Git workflow like before, and the marked files will now be managed by Git LFS!
Existing Files - For The Maximum Benefit
Caution: The below steps result in a destructive git repo operation, and should be done carefully After performing the below steps, all members of your team will need to delete their local repos and re-clone the project repo. This is because their existing local repos will no longer be compatible with the newly force pushed master.
For an existing repo, you will get the biggest gain from using Git LFS by retroactively applying Git LFS to files and folders. Here is how to integrate Git LFS as if you have been using it since the beginning of your project.
For setup, do the same steps as before, but for files that are already being tracked in Git:
- Migrate file type(s) that you want.
git lfs migrate import --include-ref=master --include="*.png"
- Migrate the folder(s) that you want.
git lfs migrate import --include-ref=master --include="path/to/some/folder/*"- If at one point this folder’s path changed, you are better off tracking specific file types. This is because Git LFS migrate will go back as far as it can, but stops when the path name changed.
- Make sure your project still works 😅.
- Force push (e.g., master).
- git push master --force
- Careful — See caution above!
- git push master --force
Comparison of Git with (and without) Git LFS
As an example I created an example project (https://github.com/jasonzurita/Git-LFS-Test) to compare Git with and without Git LFS.
- I created a large-ish dummy movie file.
- Then, I created several small change commits to that movie file like trimming the movie by a few seconds.
- Then to make the comparison, I created a branch off of master and retroactively used Git LFS. The branch is named with-git-lfs.
The result was that cloning the project took close to half the time (~15s vs ~30s) when directly cloning the branch using Git LFS — and this is for a small example project. Imagine the potential impact for more mature projects with lots of file changes of this nature!!
To try this yourself:
- Clone master (and time how long that takes).
git clone https://github.com/jasonzurita/Git-LFS-Test.git test-master
- Clone the branch with Git LFS setup (and time how long it takes).
git clone --single-branch --branch with-git-lfs https://github.com/jasonzurita/Git-LFS-Test.git test-lfs
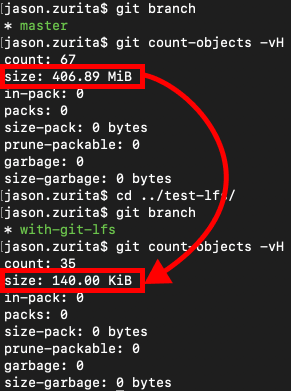
You can also see the difference Git LFS makes in the Git repo size here:
Considerations
- When cloning a repo with Git LFS, you will need to make sure Git LFS is installed or you may get some errors when cloning the repo. Furthermore, best to add this additional setup step to the README or setup script if you have one.
- If you have a CI/CD system setup, make sure you also add the installation of Git LFS to that workflow.
- Each git service is different in their support for Git LFS, so be sure to check them out.
- For example: GitHub’s docs, BitBucket’s docs
- Although you may not have to address this, there are some GitHub pricing implications worth checking out.
- For more information on Git LFS:
git lfs --help - Git LFS is open sourced here.
Thank you for reading!
Feel free to reach out on Twitter — cheers!